Add SSL to your nginx site for free with let's encrypt
In this tutorial. I'll guide you through installing Let's Encrypt SSL certificates on Nginx powered websites.

In this tutorial, I’ll guide you through the process of installing let’s encrypt SSL certificates on your nginx powered website. By the end of the tutorial, we’ll have done the following:
- Installed the let’s encrypt service
- Generate a free let’s encrypt SSL certificate
- Install free SSL certificate in nginx to secure your site

Throughout this tutorial, I’ll be installing and configuring in Ubuntu 16.04, but the instructions will also work fine with Debian. I haven’t tested but there’s no reason why this tutorial won’t work to install SSL to your nginx site on Raspbian for a Raspberry Pi.
Let’s Encrypt is a free service which allows you to create short-life SSL certificates for your web application. It’s a great alternative to paying for SSL from the likes of GoDaddy or NameCheap.
Why secure your site with SSL?
SSL encrypts requests made between a web server and a visitors browser. This ensures requests and responses happen in a manner that can’t be intercepted. Furthermore, there’s a level of authentication which means that if an SSL certificate was intended for a different domain, the user is made aware and most modern browsers will block the request.
Google have a great article about HTTPS that I recommend anyone to read.
Step 1 – Install the Let’s Encrypt client
The installation is very straight forward. First, we’ll make sure we’re all up to date by installing updates and upgrades:
sudo apt-get update && sudo apt-get upgrade
Now we’ll install the Let’s Encrypt client:
sudo apt-get install letsencrypt
We’ve now installed the Let’s Encrypt client. This is what we’ll use to generate SSL certificates.
Step 2 – Generate a free SSL certificate
We’re ready to generate our first SSL certificate. I’m going to make two assumptions here, first that your site resides in /var/www/ and secondly that you want a certificate for your ‘www.’ subdomain. Run the following command to add an SSL certificate to your site, changing ‘example.com’ to suit your setup:
letsencrypt certonly --webroot -w /var/www/example.com -d example.com -d www.example.com
This will create your certificate files in /etc/letsencrypt/live/example.com/.
Step 3 – Configure Nginx to use the SSL certificate
Finally, we need to make changes to our virtual host to tell it to use SSL. There’s going to be loads of assumptions coming up, so make sure you change your configuration to suit your needs. You may also need to force non-SSL traffic to your SSL site.
First, we generate some DH parameters. A great explanation of why we do this can be found at this stack exchange post. Switch directory:
cd /etc/ssl/certs/
Now generate the certificate:
openssl dhparam -out dhparam.pem 4096
I’m assuming that you are editing the built-in virtual host and that it has always worked. Below is a sample of how this might look after we’ve made our changes. I’ve highlighted the changed bits in red:
sudo nano /etc/nginx/sites-available/default
Then modify the file:
server {
    listen 443 ssl default_server;
    listen [::]:443 ssl default_server;
    ssl_certificate /etc/letsencrypt/live/example.com/fullchain.pem;
    ssl_certificate_key /etc/letsencrypt/live/example.com/privkey.pem;
    ssl_protocols TLSv1 TLSv1.1 TLSv1.2;
    ssl_session_cache shared:SSL:10m;
    ssl_session_timeout 10m;
    ssl_dhparam /etc/ssl/certs/dhparam.pem;

    root /var/www/example.com;
    index index.html index.htm index.nginx-debian.html;
    server_name www.example.com example.com;
    location / {
        try_files $uri $uri/ =404;
    }
    location ~ \.php$ {
        include snippets/fastcgi-php.conf;
        fastcgi_pass unix:/run/php/php7.0-fpm.sock;
    }
    location ~ /\.ht {
        deny all;
    }
}
Finally, we need to ensure the configuration isn’t broken. We do this by running the following command:
sudo service nginx configtest
If all’s well, go ahead and restart the service:
sudo service nginx restart
Go ahead, give your site a go. It should now be SSL secured – for free.
Conclusion
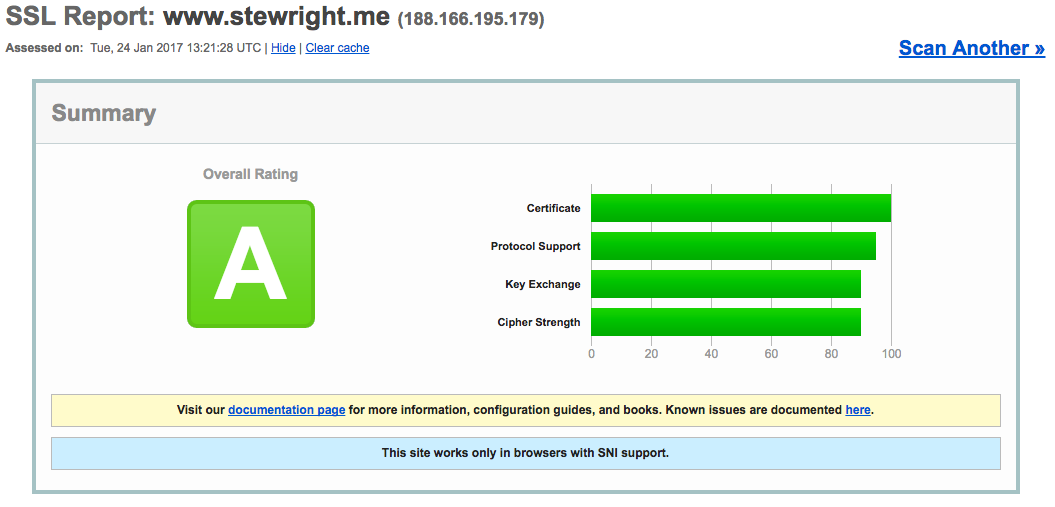
Not only have we added an SSL to our site, we’ve strengthened our configuring by adding DH parameters and setting our cyphers. Running our sites through some tests we can see everything’s in place:

Running some extended tests through SSLLabs we can see we get an A rating with this configuration.

Have any feedback, questions or comments, go ahead below.

