Install Raspbian on a USB Flash drive from MacOS or Linux
This guide will help you through the steps necessary to install Raspbian (current version at the time of writing, Raspbian Jesse) onto a USB Flash drive from MacOS (OS X) or Linux (ie Ubuntu)

This guide will help you through the steps necessary to install Raspbian (current version at the time of writing, Raspbian Jesse) onto a USB Flash drive from MacOS (OS X) or Linux (ie Ubuntu). You will need a good quality USB Flash Drive, a USB MicroSD card and a Raspberry Pi (I’m using a Raspberry Pi 3 with WiFi).
Using Microsoft Windows?
There’s a Windows version of this tutorial, check it out over here.
Before we begin
This method of booting is experimental and won’t work with all USB Flash devices. I’ve tried this using a Raspberry Pi 3 and had success using both Corsair Voyager 3 and Toshiba Flash USB flash drives. Let me know your device and whether or not you succeeded in the comments.
Make your Raspberry Pi quicker and more reliable
The biggest benefit of using a USB flash drive is, they are far more reliable than MicroSD for running Raspbian and tend to be a lot quicker. It’s a cheap way of improving the performance of your Raspberry Pi.

Step 1 – Download and install Raspbian image on the USB Flash and MicroSD
Visit the Raspbian website download page (Raspbian download page here) to download the image. I’m using Raspbian Jesse Lite as I don’t require the GUI but use Pixel if you wish. Once you’ve done that, insert your MicroSD card into the card reader on your computer.
Open a terminal window and type the following command if you’re using MacOS (inc OS X):
diskutil list
Or if you’re using a Linux machine (ie Ubuntu):
fdisk -l
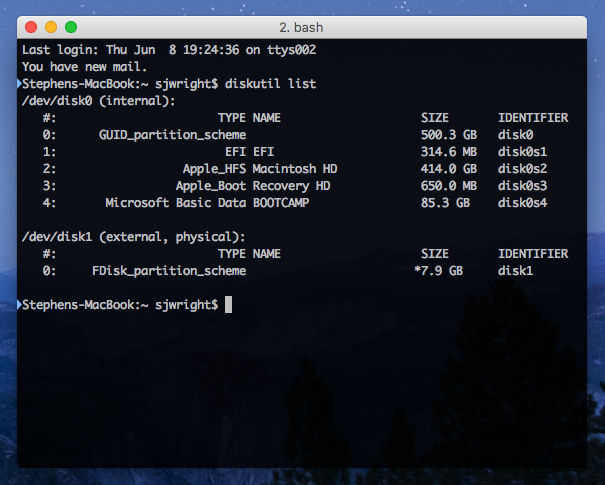
You should see something similar to this (if you’re using MacOS/OS X):

We can see that the MicroSD device is located at /dev/disk1. This might vary on your machine. We need to unmount this using the following command in MacOS (inc OS X):
diskutil unmountDisk /dev/disk1
Or if you’re using Linux (ie Ubuntu), changing sdb1 for your MicroSD card:
sudo umount /dev/sdb1
Ok, next we need to copy the files from the image to the MicroSD card. I’m Make sure the Raspbian image is unzipped, I’m assuming that your Raspbian image is in your Downloads folder. Change directory to your downloads folder:
cd ~/Downloads
Next copy to the device using:
sudo dd bs=1m if=2017-04-10-raspbian-jessie-lite.img of=/dev/disk1
Remember to change the ‘2017-04-10-raspbian-jessie-lite.img’ filename to the actual filename of your Raspbian image. Also, remember to change ‘/dev/disk1’ to suit your machine.
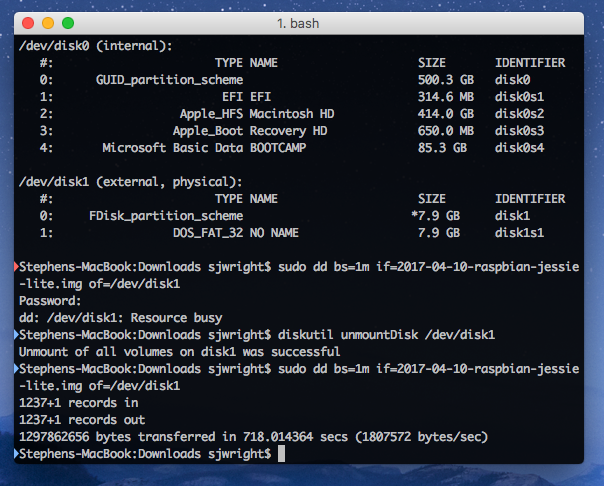
After a while, the files will finish copying from the Raspbian Jesse image to the MicroSD card, you will see something like this:

Once this is done, eject the MicroSD card in MacOS (and OS X):
diskutil unmountDisk /dev/disk1
or if you’re in Ubuntu or similar:
sudo umount /dev/sdb1
Repeat step 1 but this time for the USB Flash Drive.
Step 2 – Prepare the Raspberry Pi
Next we need to insert the USB drive into the Raspberry Pi and boot it up. Once you’re booted and logged in, open the terminal window if you’re in the GUI and make sure you’re up-to-date using:
sudo apt-get update -y && sudo apt-get upgrade -y
Now we need to modify our config file to try and get our device to boot from USB Flash devices:
Next, edit the config file using this command:
sudo nano /boot/config.txt
Add the following line to the bottom of the file:
program_usb_boot_mode=1
Save and exit using CTRL + x. You will need to hit Y to confirm the changes.
Step 3 – Boot Raspbian from USB Flash drive
Now we need to insert our prepared USB flash drive into the Raspberry Pi. From the Raspberry Pi terminal, restart using:
sudo reboot
Once rebooted, from the terminal in the Raspberry Pi, type the following command:
vcgencmd otp_dump | grep 17
If you see 17:30200000a, the OTP has been successfully reconfigured. Shut down your Raspberry Pi:
sudo halt
Once the Raspberry Pi is completely shut down, remove the MicroSD leaving only the USB Flash drive. Reconnect the power and hopefully, the Raspberry Pi will restart from the USB Flash drive.
Conclusion
Booting from a quality USB Flash drive provides many benefits. They tend to be a lot quicker and more reliable than MicroSD cards. Let me know your thoughts and let me know if you got this working with your USB Flash devices. I will build a list of devices this works on over time.

