Tutorial - Install WordPress on a Raspberry Pi using Nginx
In this tutorial, I will teach you how to install WordPress on a Raspberry Pi using Nginx as the web server.

This is the final part in a 3 part series which has seen us install Nginx and PHP on Raspbian, install and configure MySQL Server, and finally installing WordPress. Let's get started.
Article Update 20 June 2012 20:55: Please note, since publishing this article, an additional instruction has been added. If you've previously used this tutorial, please make sure you install php-apc.
Prerequisites
As with the previous tutorials, I am assuming that you are familiar with and comfortable using the command line interface. I'm also assuming that you've followed the previous two tutorials; Install Nginx and PHP on Raspberry Pi and Install MySQL server on Raspbian.
Step 1 – Download WordPress
We'll switch to using heightened permissions for all of the next. To do this, type:
sudo -i
Navigate to your document root. By default, this is located at /usr/share/nginx/www/:
cd /usr/share/nginx/www/
Remove the default nginx files so that the directory is clean:
rm 50x.html index.html
Download WordPress:
wget http://wordpress.org/latest.tar.gz
Extract WordPress and remove the downloaded file:
tar xzvf latest.tar.gz && rm latest.tar.gz
All the files will extract to a directory called 'wordpress' in our document root. We don't want our users to visit http://mydomain.com/wordpress to be able to see the WordPress website, so we need to move all the files to the document root and remove the 'wordpress' directory. To do this, we begin by changing to the 'wordpress' directory:
cd wordpress
Let's move everything to where it needs to be, in the document root:
mv ../ *
So, what does this mean? The first part 'mv' is the move command. The next part '../' means move to the parent directory, and finally the asterisk '*' means 'everything in this directory'. So we're saying 'move to the parent directory, everything in this one'. We finish by changing to the document root directory and remove the 'wordpress' directory:
cd ../ && rm -rf wordpress
Step 2 – Add some extra packages
We're almost there. Now, we need to add a couple more packages that WordPress relies on. We do our usual updating and upgrading:
sudo apt-get update && sudo apt-get upgrade
Install any updates which need installing, and finally install Curl, GD image library and SSH2 library:
sudo apt-get install php5-curl php5-gd libssh2-php
To improve the performance of PHP5-FPM, we need to install a PHP cacher:
sudo apt-get install php-apc
Step 3 – Configure WordPress
To start using WordPress, we need to make some changes to the configuration file. To start, create a copy of the sample WordPress configuration file:
cp wp-config-sample.php wp-config.php
Next, edit the file and provide our local database connection details. Start by typing:
nano wp-config.php
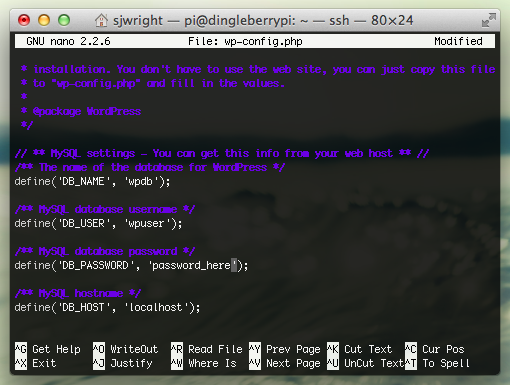
Scroll down until you see the database credentials part of the configuration file. You shouldn't have to scroll too far. Enter the database name, username and password we created in the previous tutorial. Your configuration file should look a little something like this by now:
Save and exit by pressing CTRL + X on your keyboard. Finally, we navigate to the URL or IP address of the Raspberry Pi. If all goes well, we should see the WordPress setup page:
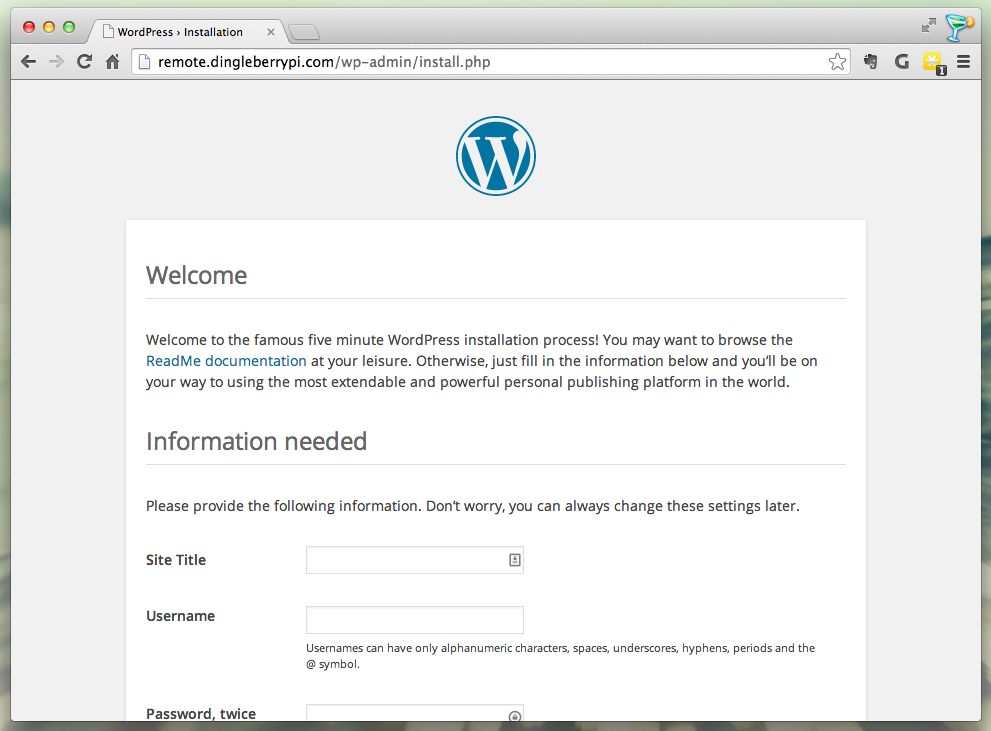
Fill in your details, and you're done with the setup. Once you've completed the 'Information needed', we will see the success page. Congratulations! You've installed WordPress on your Raspberry Pi!
Optional but recommended – Some other configurations
These are additional configuration changes that aren't essential, but will improve your experience of running WordPress from Nginx on a Raspberry Pi.
Enable pretty permalinks in Nginx
One question I've been asked numerous times is “how do I get pretty permalinks to work with WordPress and Nginx?”. This is incredibly straightforward, it requires one tweak of the configuration file. To begin type the following command:
sudo nano /etc/nginx/sites-available/default
Nano editor will launch with the configuration file that we've already adjusted in the first tutorial in this three part series. Scroll to the line that reads try_files $uri $uri/ /index.html; as shown in this screenshot:
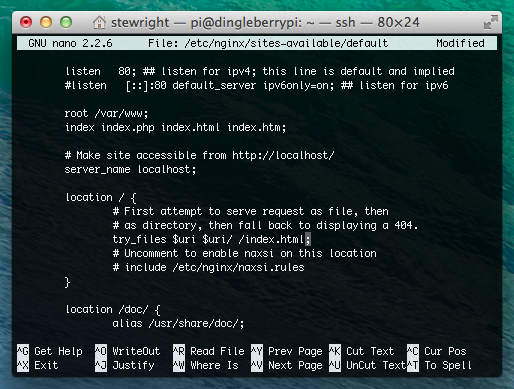
Simply edit this line to read the following:
try_files $uri $uri/ /index.php;
This will ensure all requests are sent to index.php (and therefore WordPress) for handling. Just remember to enable pretty permalinks from your WordPress Admin panel.
Set some permissions
These permissions will enable you to upload image files, install plugins and updates. To begin, we need to change the owner of your www directory to www-data as this is the user that Nginx runs as. Assuming you're using the default root path, type the following:
sudo chown -R www-data:www-data /usr/share/nginx/www
Now we need to set the permissions on the wp-config.php file to make it nice and secure. Be aware, some plugins such as cache plugins require making changes to your wp-config.php file. I would always recommend making these changes yourself.
sudo chmod 644 /usr/share/nginx/www/wp-config.php
Next, let's change the permissions of your wp-content directory to allow file uploads and plugin installation:
sudo chmod -R 755 /usr/share/nginx/www/wp-content/
Finally, to allow plugins to be installed without the need to install a FTP server, open your config file:
sudo nano /usr/share/nginx/www/wp-config.php
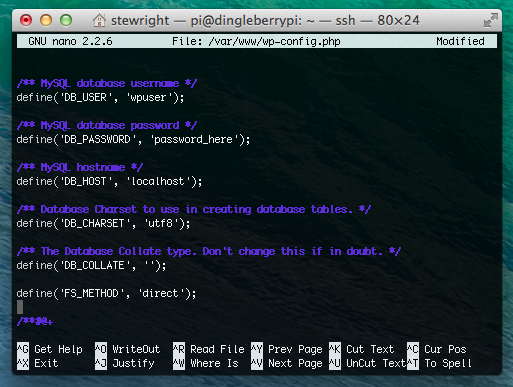
Scroll to the line below define('DB_COLLATE', ''); and add the following line to your configuration:
define('FS_METHOD', 'direct');
Your configuration might look a little something like this now:
Save your config file and you're ready to rock.
Conclusion
So, in the first tutorial we installed and made some basic configurations for Nginx and PHP. In the second tutorial we installed and configured MySQL database server. Then I baked a Pi, and finally we've installed and configured WordPress. That concludes the final part in this tutorial series. Let me know your thoughts, share them below. Thanks for reading, stick the kettle on, mines a tea with no sugar.

